Kategoriarkiv: Spelutveckling – introduktion

Game Development – Nr.6 | Magic Writer

Hello everyone!

This weeks post will be related to the last post. The last post was about me creating a power up bar that loads up and lights power up icons when they are ready to use.

Since last time we have redesigned the power up bar. The last example was draw by me (programmer art) and was not very pleasant to look at. We want to avoid static HUD as much as we can, this means that we do not want to incorporate for example a HUD frame that show the current score or a HUD bar that show when power ups and their cooldown on them. We want to display these things in a way that we can show inside the game world. As an example we show the current score that the player has written into the sand. So we redesigned the old power up bar, it is now shown by having small buoys connected on a rope that goes out into the water. We have two of these ropes in the game. One on each side of the screen, the left one represents the power up bar and the right one represents health points.

background

This is how it looks right now

The white buoys represents how much the power up bar is loaded. As you can see it is half way to reaching the top. It has passed the first power up icon and it is shown by making the icon light up, the second and third is still darkened out. To show the player how to use the power up we have bigger buoys next to each icon which represents which key the player is supposed to press. The bigger buoys will switch from red to green when they are ready to use, showing even more that the player can press the numbers shown on the buoys to activate the power up.

By representing the HUD inside of the game as props i think it makes the game look a lot better and cleaner. We can get rid of these sticky HUD bars and numbers but there is also a risk with doing it this way. The player may think that the props are just that…. props. I think it is important to have them dynamic, constantly changing to make the player understand the meaning of them. Both the power up bar, the bigger buoys and score in the sand is constantly changing.


Game Development – Nr.5 | Magic Writer

Hello everyone!

This week i have continued working on the previous project Magic Writer. This week has mostly been about polishing everything in the game. There is not many new mechanics to implement anymore so i have been working a little bit on everything. I will talk about the ”biggest” artifact of this week even though I have mostly been working on small artifacts/polishing.


The power up bar

The main purpose of this power up bar is to give a visual representation of when the player can use a power up. It works by having a bar constantly grow upwards and eventually reaching different steps on the way. The power up bar is divided into three sections which each have a step marked on the bar. Each section represents a power up and when the bar reaches the sections step the power up can be used by the player. Each time a player enters a word without mistyping, the bar will increase even more. When a power up is ready to be activated an icon next to the bar lights up to show the player that the power up is ready to be used. Each icon displays what the power up will when used. Because the power up bar increases and reaches three steps on the way we had to sort the three power ups in order of which one is the best. We decided that the pierce power up was the less powerful and that the freeze power up was the most powerful. So the first step in the bar is connected with pierce, the second step is connected to the bounce power up and the third step is connected to the freeze power up. This gives the player different options when choosing to activate a power up. He could maybe be able to activate the first power up but choose to wait until the second one is ready to be used. This creates a much more interesting mechanic than to just have each power up on a separate cooldown,

This is a picture displaying each step and their icons, the numbers show what key is used to activate a power up. This is not the final art for the power up bar, the icons are complete but the bar and frame will be changed.

Featured image

When a power up is activated the amount of cost is removed from the bar. Example: If the player would use number one in above case, the bar would remove the one ”step” from the bar.


Game Development – Nr.4 | Magic Writer

HighscoreManager

This week i have been working on updating a previous version of our high score system. The first version of the system worked in three steps. The first step was to load a .txt file and read different scores such as ”1000” etc. The second step was to sort all of the scores with the highest score first. The third step was to add a new high score and check if the new score mad e it to the high score list.

The new system works similar but with some different results.


The new system works by connecting a score to a name. By having a struct called ScoreEntry i could easily connect a name and a score. This is how the struct looks like:

struct ScoreEntry
{
      //Stores the users name
      std::string name;

      //Stores the users score
      int score;

      //Returns a string that connects the name and score as one string
       std::string GetText()
       {
            return (name + " " + std::to_string(score));
       }
};

So the highscore works by having a vector (a list) that holds X number of these ScoreEntry structs. The first element in the vector is equal to the player with highest score. By having them sorted in the vector it gets easier to draw all the user scores in score order later on.


Loading the highscores
When the game starts the old high scores are loaded by opening a .txt file where the previous scores are saved. Then i read a name and a score from the file and connecting them by creating a ScoreEntry struct and then adding he struct to the vector which holds all the other entries.

 while (!file.eof())
 {
      ScoreEntry entry;
      file >> entry.name;
      file >> entry.score;

      m_entries.push_back(entry);
 }

Adding a new high score
When adding a new high score i check each existing high score in the vector and compare the new score with the score in the loop. If the new score is greater than the current one in the loop i add the new entry at that index in the vector which results in pushing each other index down in the list. What this means is that the score sorts itself when adding a new score. I don’t have to sort the whole vector using bubblesorting or something similar.

This is a short example of how this works…. (Not the full code for writing)

 for (int i = 0; i < m_entries.size(); i++)
 {
      //Compare new entries score and the old ones
      if (entry.score > m_entries[i].score)
      {
           //Add new score one step above the last score
           m_entries.insert(m_entries.begin() + i, entry);
      }

      //Write entry to file
      file << m_entries[i].name;
      file << " " << m_entries[i].score;
 }

Displaying the scores
As i said before, the list automatically sorts itself. So when i loop through all the entries i can easily just draw them in their index order to draw the with the highest score at place 1 and the next one on place 2 and so on.
I use the index as the number of which the player is on the highscore list. The user at index 0 will have a ”1.” next to its name and so on…
Example: ”1. David 5731”

 for (int i = 0; i < m_entries.size(); i++)
 {
      m_text.setString(std::to_string(i + 1) + ". " + m_entries[i].GetText());
      m_text.setPosition(m_position.x, m_position.y + i * 45);

      drawManager->Draw(m_text, sf::RenderStates::Default);
 }

The result is this

highscore


Game Development – Nr.3 | Magic Writer

Particle system

Among many things i have worked on a particle system this week. At first i was not sure how to start, i had only done this once or twice in another programming language (C#). What I am about to explain is the current state of the system, it is not what i indent to have at the end meaning that it is not finished yet.

So far I have created two classes, a ”Particle” class and a ”ParticleEmitter” class. I’ll start with the particle class.


Particle: The particle contains some variables which stores information on how the particle will behave:

class Particle
{
private:
 //Stores the current speed of which the particle is moving
 sf::Vector2f m_velocity;
 //Acceleration will be added to the velocity every frame
 sf::Vector2f m_acceleration;
 //Stores the particles sprite
 sf::Sprite m_sprite;
 //The lifetime of the particle (How long will it be showed on the screen)
 float m_secondsToLive;
 //The current life of the particle, goes from 255 to 0
 int m_life;
 //A timer used to decrease life and change particle in other ways
 float m_timer;
 //A boolean if the particle is currently active or not
 bool m_active;
 //A boolean if the particle should scale itself or not
 bool m_scaleParticle;
};

NOTE: This is only the member variables of the Particle class.

So over to the ParticleEmitter…
The manager’s job is to create X number of particles in the beginning of the game, update and draw all active particles and to remove all particles when the application exits. So the Emitter has a list of particles and it activates the particle at a certain spawn rate in its update method. This is the Emitters member variables and its update method.

void ParticleEmitter::Update(float deltaTime)
{
   //Increase timer
      m_timer += deltaTime;

   //Check for timer tick
   if (m_timer > m_spawnRate)
   {
        //Reset timer
        m_timer = 0;

        //Create a new particle
               CreateParticle();
   }

   //Update all active particles
      for (int i = 0; i < m_particles.size(); i++)
   {
            if (!m_particles[i]->Active())
      continue;

      m_particles[i]->Update(deltaTime);
   }
}

private:
 //Contains an area which a particle is randomly created within
 sf::IntRect m_area;

 //Stores all the created particles
 std::vector<Particle*> m_particles;
 //What velocity to activate a particle in
 sf::Vector2f m_startVelocity;
 //What acceleration to give an activated particle
 sf::Vector2f m_acceleration;
 //What texture the particle should have
 sf::Texture* m_particleTexture;
 //Stores the particles lifetime
 float m_secondsToLive;
 //A boolean if the particle should be scaled or not
 bool m_scaleParticle;
 //At what rate should we activate each particle (milliseconds)
 float m_spawnRate;
 //A timer used to activate particles
 float m_timer;

I will give an example of how it works… When I create a new Emitter I decided how many particles the Emitter will create (maybe 50-100) and also set a spawn rate and a texture for the particles.
The Emitter will then create said number of particles and store them as inactive in the vector.
When I update the Emitter its timer will tick and ”Create” a new particle (Activate an inactive one). The particle will then update itself with its velocity and other variables. When the particles life goes below 0 it will deactivate itself.

By setting a high spawn rate and having the particles fade out and decrease in scale a pretty cool effect appears. This is a picture of how it looks when i apply a Emitter to a monster. I give it a water ripple/foam texture and apply a velocity opposite from the monsters movement direction.

particle

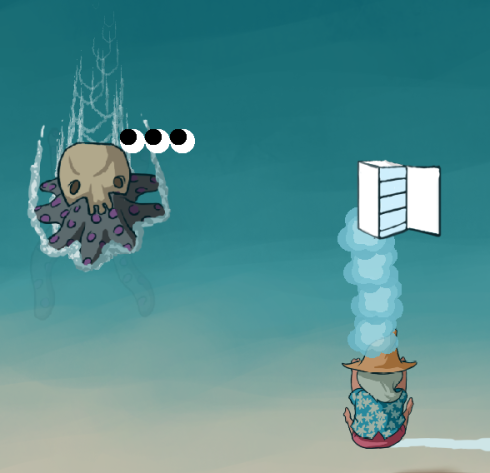
There is also a temporary emitter on the thrown object (The freezer). This looks a lot better when it is in action. But you can see some particles flowing upwards behind the monster and some blue clouds flying downwards from the freezer.

The meaning of the particle emitter is to enhance the effect of mainly the monsters. The lava monster will probably have som flame particles on him and the ice monster will maybe have some frost clouds flying out from him.

As i said earlier, this system is not complete. I will implement more such as choosing a color for each particle and being able to create an explosion from the emitter.


Game Development – Nr.2 | Magic Writer

Loading items

This week i have worked on loading the throwable items into the game. Loading their sprite and correlating it with a property. Instantiating all the items in the beginning, deleting them when the application closes and reusing them in runtime.

We have a spritesheet for each property, we have a item_alive_spritesheet and a item_dead_spritesheet and so on for each property. Together with each spritesheet there is a .txt file that is connected with its sheet. So item_alive_spriteshee.png has an item_alive_names.txt. This .txt file contains the names of each item. The first name in the .txt file is connected with the first item in the spritesheet.

This is the alive spritesheet:

.Featured image

The .txt file for this sheet would look like this:

alive_text

Over to the code part…


I created a class called ItemManager. The ItemManagers job is to load the spritesheets and .txt files and create an instance of the Item class for each item. Each has the same size in the spritesheet so we can access them easily.

The first step is to loop through the .txt file and for each row in the file we create an instance of a new Item and give the instance the item_spritesheet, a item_sourceRectangle and an item_name
item_spritesheet = The current spritesheet that we are loading.
item_sourceRectangle = The rectangle in the spritesheet the item should get its texture from.
item_name = The name from the .txt file.

I also check if the text on the current row in the .txt file is equal to ”-” it means that the spritesheet jumps down a row. This is a code example of how the above method works:

while (!stream.eof())
{
    //Read item name from textfile
    std::string itemName;
    std::getline(stream, itemName);

    if (itemName == "-")
    {
       //Change the sourceRectangles position one step down
       sourceRectangle.left = 0;
       sourceRectangle.top += itemSize;
       row++;
    }
    else
    {
       //Create a new item with spritesheet, sourceRectangle and name
       Item* item = new Item(itemSpriteSheet, sourceRectangle, property, itemName);
       m_items.push_back(item);

       //Change the sourceRectangles position one step to the right
       sourceRectangle.left += itemSize;
    }
}

As you can see there is a vector called m_items that holds all the instantiated items. This method happens for each spritesheet and .txt file in the beginning of the game.


Now how do we access these items?  I created a method called GetItem which returns an Item*. This method randomizes an index between zero and the size of m_items vector. We access the item at the index and check if the item is currently in the game or not by checking a boolean called ”inGame” inside each item. If it is not inside the game we return the item and set the property inGame to true. When the item is later returned to the vector its property inGame is set to false again.

This is how the GetItem() method looks like:

Item* ItemManager::GetItem()
{
    //Start an infinite loop.
    while (true)
    {
       //Randomize a index between 0 and the total item count.
       int randomIndex = rand() % m_items.size();

       //Access the item at randomized index.
       Item* item = m_items[randomIndex];

       //Check if the item is not active and is not inside the game.
       if (!item->IsActive() && !item->IsInGame())
       {
          //Return the item and set in game to true.
          item->SetInGame(true);
          return item;
       }
    }
}

Game Development – Nr.1 | Magic Writer

Background around the game
Magic Writer is a game where you play as a wizard relaxing on a beach when monsters all of a sudden starts attacking from the ocean. The wizard defends the people on the beach by conjuring items and throwing them at the monsters. The player conjures items by typing the items name.

The process of checking for typed items has two steps. There is a list of three active words, these are the words that the player can type to conjure.


Typing words with highlights
First step: We have a string variable (playerInput) which holds what the player has input, we also have a char variable (inputChar) holding the current input key. When the player presses a key the inputChar registers the key and it is time to check if the character fits into the active words. To do this we need to know which index we are checking in each word. We can access the index by taking the size playerInput. Lets say that the player is supposed to type the word ”Panda”. If the player has entered ”Pa” already, the size of the variable playerInput is 2 which will act as the index. So when the player presses a new key, maybe ”n”. A function checks all the active words at letter index 2 if the characters match. Index 2 in the word ”Panda” is ”n”, therefore it is a match. This leaves the word still active for typing, if the characters does not match the word gets deactivated and is not checked in the function next time.

Second step: The second step is drawing the words in the list. We loop through all words and we draw the deactivated ones with a light blue color to show that they are inactive. If the word is active we draw each letter separately in order to get different colors for each letter. So we loop through each active word and for each letter we check if the index of the letter is smaller than the size of the players input, if it is smaller the letters color is green showing that the letter is typed. Else the color is dark blue showing that the word can still be typed. So if the player has entered ”Pa” the size is still 2. This means that the first two letters in the word is drawn green and the rest dark blue.


The reason for the highlighting is for the player to see where in the word the wizard is currently conjuring. This allows the player to see how far he/she has typed and what the next letter is supposed to be.

Example of how the panda scenario will look like.

Featured image

Example of a deactivated word.

Featured image